
Lighting a Painting
|
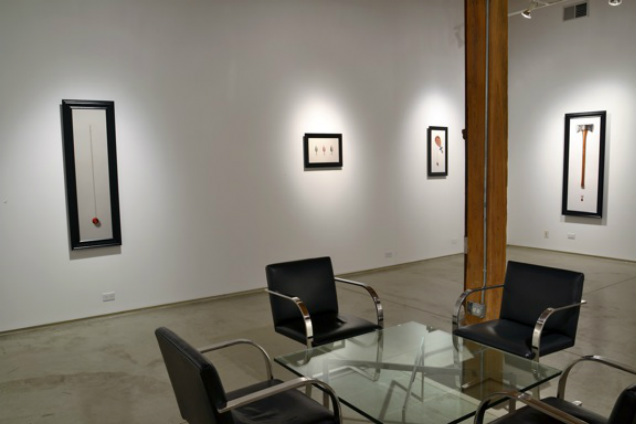
Lighting a painting to diplay is pretty straightforward and simple to do if you have the resources. The image to the right is the most common way to do so. The ceiling in this gallery has track lighting where one or two halogen PAR lamps illuminate a painting. If you are not sure what a PAR Lamp is, check out my article where I compared a Standard Bulb Vs. PAR Flood Light. As you can see the paintings are illuminated more than the rest of the room via the PAR's. The general rule is to light the artwork 3 times brighter than rest of the light in the room. Another rule is to have the light source at a 35 degree angle from the painting. If the angle is too great, you will see reflections of the light on the surface of the art. If the angle is too small, you will not achieve an even distribution of light. The light source doesn't have to be ,an exact 35 degrees to properly illuminate a painting - its just a reference, anywhere from 30 - 40 degrees should be fine.
|
|
|
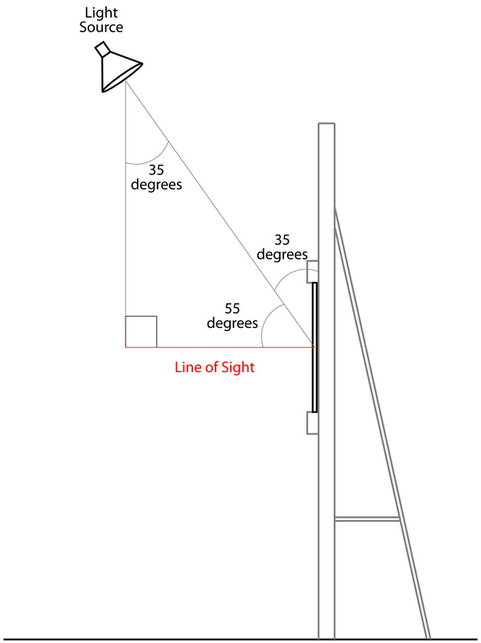
Lighting a painting on an easel is really no different. Again, you want the light at about 35 degrees to your canvas. This prevents glare and will help you see the painting better.
If you have a window anywhere near your easel, be sure to close the blinds, or better yet, invest in some black out curtains. If the window is behind you, it can cause gIare. Its also best to avoid mixing light from different sources. One minor problem you may experience from lighting your painting this way is light falloff. As the distance of the light and subject increases, the less bright the light will be. So you may experience more light on the top of your canvas than the bottom. One way to help correct this is to mount your lights as high as possible. This will lessen the effect of light falloff. If you have 8 feet tall ceilings like I do, about 7 1/2 feet is the limit. The light falloff typically doesn't bother me unless I'm working on a large painting.
|
|
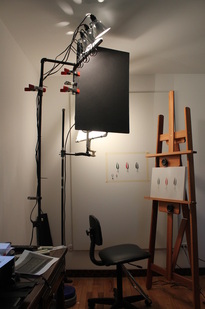
The image to the right is my solution to getting enough light on my painting. Some artist are fortune enough to have a sky light in the ceiling they can utilize for their art creation. I am not, but I have found a simple, cost effective way to get light at the right angle on my painting.
I don't have much room in my studio for large light stands and booms, so I need to find ways to conserve space. Lucky for me I like to arrange my still lifes on the wall for a trompe l'oeil effect; this saves a lot of space. Like I mentioned earlier, I don't have a skylight, nor do I have track lighting in the ceiling, so I needed a tall light stand to place behind me. I looked on a few photo websites that carry studio equipment, but couldn't find anything like what I wanted. Every light stand has large tripod legs that would never work in the space I have; so I opted to build my own from 1/2" black pipe. |
|
This light stand is very easy to build, and just about anyone can put one together. I saved a lot of space creating a weighted base. I recommend 3/4" plywood for the base. However, MDF works too. I cut my base to match the shape of the weights I'm using, but whatever you decide on is fine. Remember the larger it is, the more stable your light stand will be. Since my base is smaller, I opted to have more weight. I'm using four 10 pound plates that I found at a Good Will store for $2.99 each. Weights are expensive when purchased new, often a $1 per pound, so be sure to check second hand shops if you don't already have them.
|
The black foam board functions as barn doors do on studio lights and prevents any stray light on my subject. If you work strictly from photographs, omit this. Since I'm right handed, I look to my left to view my still life, so I mounted the black foam board on the left. The easiest way is to use two 2" spring clamps. They wrap around the pipe and grab the foam board. The cap at the end of that section of pipe stops them from sliding off. If you are left handed and look to the right to view your subject, you will want the foam board on the opposite side.
All these parts can be found at your local home improvement store. At the bottom of the page I included a PDF with instructions on how to assemble the pipe. If you have the opportunity to build it taller, do so. The instructions I provide will allow it to fit in a room with an 8 foot ceiling. FYI, sections of black pipe are called nipples. I don't know why, they just are. If you have trouble finding them in the store, just ask an employee where they keep the black nipples. |
|
Parts List
1/2" Black Pipe Fittings5' Nipple - $7.30
18" Nipple x2 - $6.58 10" Nipple - $2.24 8" Nipple - $2.09 1" or Close nipple - .59 90 Degree elbow x2 - $1.72 Coupling - $1.09 Tee - $1.09 Cap - .86 Floor flange - $3.87 Total - $27.53 |
Other5 1/2" Clamp lights x3 - $ 19.47
2" Spring camp x2 - $1.98 3/4" 2' by 2' Plywood for base - $6.19 3 Outlet extension cord - $1.99 20" by 30" Black foam board - $2.88 10 lbs Weights x4 - 11.96 #10 x 3/4" Wood Screws x4 - $1.20 Total $41.69 |
Total Cost - $69.22
The type of lights you use is your decision. If you decide to use LEDs or CFLs, make sure they have a CRI greater then 90 for the best light quality. I use three 60 watt PAR30 halogen wide floods and that's plenty of light for me.
You might be thinking $70 for a DIY lamp stand is a bit expensive, but you will not find anything like it in an art store. Oil painting equipment is a small niche market which makes it is tough to find necessary items for your studio. Often times I'll leave art stores empty handed because I couldn't find what I was looking for. Then I'm usually off to the hardware store to buy what I need to build whatever it is I have in my head. Its important to be creative and to learn how to build what you need.
You might be thinking $70 for a DIY lamp stand is a bit expensive, but you will not find anything like it in an art store. Oil painting equipment is a small niche market which makes it is tough to find necessary items for your studio. Often times I'll leave art stores empty handed because I couldn't find what I was looking for. Then I'm usually off to the hardware store to buy what I need to build whatever it is I have in my head. Its important to be creative and to learn how to build what you need.
|
Below I attached an instruction manual to assemble the light stand .
|
| ||
