
Varnishing a Painting
When I first started painting on smooth flat panels, I figured I would be able to varnish the painting to a mirror finish like one would find on a fine musical instrument. While its glossy, that is just not the case. In truth, even a painting on a smooth panel has all kinds of small little bumps, minute brush strokes, and of course dust. Even though I go to extreme to avoid dust in both the painting and the varnish, it still finds it's way in there. A shiny finish on top of this makes all of these imperfections visable in a certain angle of light. I had to lower my standards of what makes an acceptable varnish job on an oil painting. This page will share my thoughts on the subject and show you why and how to varnish a painting, plus the correct tools to make this final step in the painting process successful.
|
To the right I have included a few photos of a guitar I made in 2011. While it would be cool to give your oil painting a perfect mirror finish like this guitar, its not desirable. The guitar was finished with a clear varnish called lacquer. Its a finish that dissolves in an acetone based solvent that dries to the touch within seconds. There are about 12 coats of sprayed lacquer on this guitar. Then it was sanded perfectly level with a 1000 grit sand paper and buffed to a high luster using a buffing wheel and automotive compounds. There are different types of varnishes, varnish being a generic term for a clear finish. Only a few are recommended for paintings. I will discuss this a bit later on this page.
|
|
Why varnish your painting?
There are two main reason why you want to varnish your oil painting. The first one being it will saturate the colors and darken the shadow areas to their full potential, as the paint had while it was still wet. Oil paints by nature are glossy when wet, but many colors dry to a matte or semi-gloss finish, changing the appearance of a painting. Think of dried oil paint as a colorful river stone. When that stone is dry, the surface is dull and colors are muted. Once that stone has been wet, it's appearance changes dramatically; the colors are vibrant and rich, and overall the stone has more depth. A dried oil film works that same way when varnished. A clear varnish will restore the paint's initial color and give you that striking contrast oil paintings are known for.
The second reason for varnish is protection. A clear protective was much more vital a 100 years ago due to the use of coal for heating homes and tobacco smoke. If a varnish was not present on a painting, the dirt would coat the paint surface directly, either staining it, or at the least making it difficult to clean. Paintings then needed a barrier against the suttee, smoky air. Today the air is much cleaner and we don't have to worry as much about dirt particles in the air leeching on to paintings and staining them. An oil painting will be fine without a clear varnish as long as it is hung in a fairly clean room. The only dirt it will see is regular house dust; however, a clear protective finish is still desirable to deflect it.
type of Varnish to Use
For over a hundred years, damar had been the standard picture varnish. Before that it had been mastic which was used by the old masters. I have never used it, nor do I know anyone who has so I cannot comment first hand on its handling properties. However, its short comings are what lead to its replacement by damar. From what I have read, Mastic can bloom or turn cloudy in humid conditions, yellow and darken, and become brittle.
|
|
Damar is a soft resin found in Southeast Asia such as Singapore or Indonesia. Its obtained by tapping trees, sort of like maple syrup from maple trees except this resin hardens into crystals. Unlike mastic, damar doesn't bloom or cloud and is one of the easiest varnishes to apply to an oil painting. However, being that it is a natural resin it needs to be dissolved in a stronger spirit such as turpentine. OMS or odorless mineral spirit will not do the job. Damar resin will remain crystals in OMS and turn the spirit a milky cloudy appearance. Also, after many years, like mastic, it will yellow and become more brittle and harder to remove over time.
Part if what makes a varnish acceptable for paintings is it ability to be removed. Where Damar needs harsh solvents to be removed from a picture after many decades, new synthetic varnishes prevail. Manufactures such as Gamblin and Winsor and Newton offer acrylic resin or polymer varnishes that are crystal clear and can be removed entirely by using OMS. Some of them like Gamvar also contain UV stabilizers which help prevent yellowing and increases the life of the varnish. These modern synthetic UV stabilized varnishes are the best option available for oil paintings.
With that said about the new varnishes, I'm a bit stuck in the past - I use damar. While the new synthetic varnishes really are great, part of what makes them so is that they barely adhere to the painting surface. This is beneficial because over time, the oil paint and varnish will not cross link over many years. That means when the varnish needs to be removed and replaced, it will be relatively easy for the restorer. But, the problem I have with these newer varnishes is that I can never get them to stick to my paintings. Neither the Winsor Newton or Gamblin products work for me. The varnish beads up in some areas like water on a freshly waxed car. From the research I have done, this problem does happen, but it's not overly common. Gamblin recommends brushing the varnish into the painting over and over until the beading stops. Unfortunately, I've never had success with this method. I have also tried rubbing OMS on the painting to faintly abrade the surface before varnish; still no luck. In past efforts to make the varnish stick, I have even substituted the OMS in the Gamblin Gamvar product with turpentine. My thought was maybe a stronger solvent would help the varnish adhere to the paint surface. While the synthetic acrylic dissolved in the turpentine fine, it did nothing to help with the beading problem. |
In my frustration with the beading varnishes I desperately wanted to used, I gave up and went back to damar. Since my work is very smooth and slick, any varnish beading is unacceptable. Fortunately, I didn't ruin any good paintings in the process. I made all of the experiments on older works from college. With good old damar, I have never had a problem; it always lays down and levels outs perfectly.
|
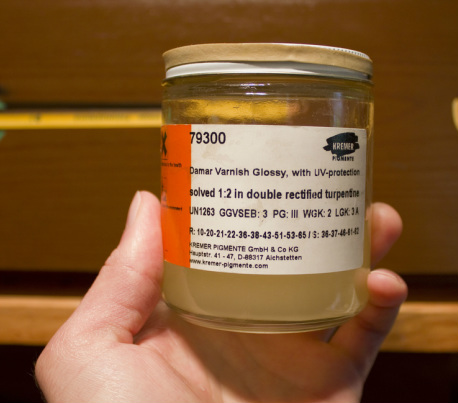
Since I'm stuck using damar, I sought out to find a damar resin with UV stabilizers. If I'm going to be using this older type of varnish, I want it look good for as long as possible. Finding such a product was difficult, but I managed to track down one manufacturer. The UV stable damar I use is from Kremer Pigments. Here is a link to the varnish - Damar Varnish Glossy, UV Stabilized.
Before purchasing this varnish, I emailed the company and asked,
"I have a couple questions regarding your damar varnish with uv stabilizers. What is life expectancy of this product once applied to a painting and how well do the uv stabilizers prevent the varnish from yellowing and aging?" I received a response from Georg Kremer himself, "The life expectancy of a paint or varnish layer depends on a huge number of different aspects. Regarding the degradation due to ultraviolett rays the uv stabilizer adds about 30 to 50 years, that is double the average life of the varnish without uv stabilizers." |
|
According to Kremer Pigments, their damar with UV stabilizers can hold up for 60 - 100 years. That sure sounds good to me. If a collector purchased a painting with this particular varnish, he or she would never have to worry about the varnish degrading in their life time. It will probably out last the second owner of the painting too. However it still is a damar, not the easiest varnish to remove compared to the new synthetics. But the way I see it, restorers have been dealing with damar for many years. A professional should have the skill and knowledge to successfully remove this natural resin from the painted surface.
What type of Brush?
All too often you will see the use of cheap brushes used to varnish a painting, especially on youtube. Sometimes even the foam brushes. One problem with cheap brushes is that they often loose hair during use. Make it easy on yourself, use a quality brush so you don't have to pick hairs out of the varnish.
Another fallacy of cheap brushes is they don't lay the varnish down evenly. Typically, picture varnish does a good job on its own flattening out but sometimes brush strokes will remain if the tip of the brush wasn't properly formed. A straight, crisp edge is desirable for laying down any clear coat or paint.
Another fallacy of cheap brushes is they don't lay the varnish down evenly. Typically, picture varnish does a good job on its own flattening out but sometimes brush strokes will remain if the tip of the brush wasn't properly formed. A straight, crisp edge is desirable for laying down any clear coat or paint.
|
The brush I use is a 2 inch Purdy Ox Hair. Art stores sell a few varnishing brushes but you don't always shop art stores for the right tools. The most common hair for varnishing is bristle or hog hair. But if a softer feel is required, brushes made of ox or red sable can be used. My brush is a blend of ox and white bristle. Its a nice balance of soft and resilient.
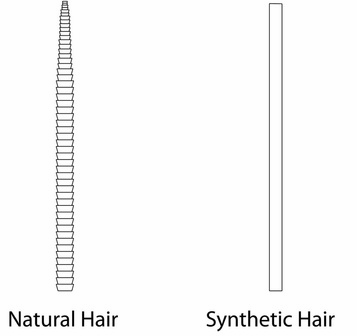
This Purdy brush is made mostly for smooth clear finishes on wood, but it also works on paintings. Most brushes in this brand can be found in hardware stores, but I had to buy this one on amazon. What makes a brush ideal for varnishing a painting is it's a ability to hold varnish in its bristles and release it evenly at the tip. For this, it needs to have a soft natural hair. Natural hair will hold more liquid than synthetic nylon because of the hair's structure how it grows.
|
|
|
If you view the image to the left, you can see on a microscopic level natural hair does not have perfect smooth edges like the synthetic; it has many small voids that add surface area to the hair. Unlike the smooth synthetic, liquid can better attach itself to an irregular surface; the result is a greater carrying capacity. This means when you are using the brush, you will not need to constantly dip it in the varnish. You will be able to discharge a large amount of varnish to the surface and have more time to distribute and level it out.
In addition, natural hair will allow you to use a smaller brush if you like. Most of my paintings are small but my 2" brush has successfully varnished larger paintings. This is due to the fact that it is capable holding a lot of varnish. Obviously, if your work is large, consider a larger brush. Always thoroughly wash the brush with soap and water the day before you plan to use it. Then shake the water out and hang it vertically by the handle to dry over night. Avoid from letting the clean bristles touch anything. This will help prevent the transfer of dust to the painting via a dirty brush. |
The ideal varnish application
The ideal coat of varnish should be as thin as possible to do the job. Once the colors have been brought back to their full saturation, you're done. There is a tendency to want to build up multiple layers of varnish to achieve a high gloss finish. You have to remember, when a painting is hung correctly you will not see that glossy clear coat, you will be looking through it. Therefore, it isn't necessary to lay down multiple thick coats of varnish on your paintings. I'm in favor of only one coat varnish on my paintings - one and done I like to say. This is how a finish on guitar differs. On a musical instrument, you want that perfect mirror finish. In order to achieve this, you need a lot of sanding prep to level the surface and numerous coats of clear. With a painting, there is no such thing as sanding all of the painted surface and you don't want a thick varnish layer because it will eventually need to be removed. So as a result, without any sanding prep, you will see small imperfections in the varnish, especially in paintings done on smooth panels. Canvas is much more forgiving due to it's texture. Always take care in removing dust and little bits of fuzz during the painting process so you have a cleaner surface when it comes time for varnish. If your objective is texture and thicker brushstrokes, do so without crusty bits of paint or dust. Texture of paint can be beautiful, but any large bumps or crud is distracting, especially if detail resides in that area. You won't be able to hide these imperfects with the varnish layer. In fact, a glossy finish will make them more noticeable.
Matte and Gloss
|
The choice between Matte and Gloss varnish is up to your personal preference. Both damar and synthetic types are naturally glossy; it is the traditional appearance. Since my approach to painting realism, I prefer the gloss. When a flatter matte is desired, wax is added to reduce the sheen. Gloss and matte varnish can also be added together for a semi-gloss finish. If you decide on matte, remember to stir the varnish before use. Often the wax will separate and settle at the bottom of the container. Improper mixing can lead to inconsistency and streaking. You can add a small marble to the varnish container to help agitate the mixture.
One needs to keep in mind the glossy varnish will always make the darks in a painting darker when compared to its matte counterpart. It will also offer the best protection from dirt, dust, and oily finger prints. While I think most people know better than to touch art, some of them don't. It must be some primitive human instinct to touch the painting on the wall. A glossy finish will better reflect that finger smudge. Matte finishes make a slightly porous surface than can absorb oil. |
|
When to Varnish
There has always been and always will be the question, how long should I wait to varnish a completed painted? For years there has been a misconception that you need to wait 6 - 12 months. I don't know who made this rule, but it is simply wrong. There is no harm in waiting that long, but usually a painting can be varnished much sooner. If you asked me, I'd tell you I varnish my paintings within 2 - 4 weeks. It really depends on the pigments and mediums you used and how thickly you paint. You are ready to varnish when the oil painting film has oxidized completely through, firm to the touch, and cannot be reconstituted or removed by OMS or turpentine. The pigment will be the largest factor in how long you have. A painting applied thinly with mostly earth tones such as burnt umber, a fast dryer, could be ready for varnish within 1 week. Contrarily, a painting done with thick, impasto, hanging off the canvas cadmium red, a slow dryer, may need years to fully oxide thoroughly; if this is your technique you may consider adding a bit of alkyd medium to help speed the drying process so you can varnish sooner. If I'm ever in doubt about varnishing, I test areas of the painting to make sure they are dry. I take a clean small sable brush, moisten it with OMS and lightly rub the surface with it. If none of the paint is removed, its ready for varnish.
Varnishing too early
|
Caution should be taken in not varnishing too early if you have used very slow drying colors like titanium white. The titanium pigment lags to form a dried paint film. Then to make matters worse, it is usually bound in slow drying, weak film forming safflower oil for its non-yellowing properties. Thus, you have a recipe for a painfully slow drying paint. This white is sluggish to dry in even linseed oil. Without the addition of an added drier (which I suspect some manufacturers use) in these whites, you really should wait 6 - 12 months to varnish. Sometimes they may seem dry, but they are not entirely; cadmiums, especially red, can fool you like this too.
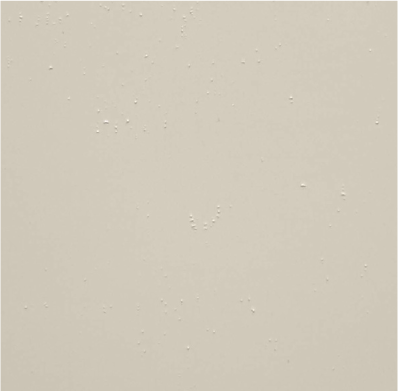
The image to right is an example of what I believe is a result from varnishing too early. Notice the small blisters? These showed up while varnishing a piece I had painted with Blue Ridge white. This part of the painting had been dry for 4 months, but I suspect that the paint wasn't quite finished drying. I've been spoiled by using quicker drying whites I think contain drying agents like Winsor and Newton; this brand dries in a fraction of the time compared to Blue Ridge's white. As for the blisters - thankfully, I was able to sand them out and rescue the painting. I'll be mixing the rest of my Blue Ridge white with other whites I know dry quicker. |
|
Retouch Varnish
Retouch varnish is simply a super thin finish. The majority of it is a solvent with just a very small amount of resin . I use the term resin here because typically it is damar based. Its not intended to be a final varnish for a painting. Artist will use it as an alternative to "oiling out", or as a quick temporary varnish before a show. Here is the problem with using it as a temporary finish - if your painting is dry enough to varnish, why not use the regular full concentrate mixture? The way I see it, retouch varnish isn't necessary for this purpose.
Prepping the Painting
|
|
Prepping the painting is the crucial step for an attractive clear finish. Many "how to" videos don't demonstrate this and it's a shame. You want to treat your painting as if it is a fine piece of furniture ready for a lush coat of clear. However, you cannot effectively sand your art so you will have to live with some bumps in the varnish from specks of dust imbedded in the paint. The objective here is to remove all the dust, bits of fuzz, and hair that has accumulated on the dry surface. I've heard of artists taking it a step further and very gently cleaning their paintings with an OMS damp rag. I don't believe this is entirely necessary unless the surface is very dirty.
I begin removing the dust with a very soft 1 inch brush. With the painting on my easel, I gently brush it away using down strokes so everything on the surface falls to the floor. This process will remove about 90% of dust. |
Next, I follow this procedure with a tack cloth. A tack cloth is a piece of cheese cloth treated with a tacky material that attracts dust. The tacky substance is most likely a resin material; don't worry, this won't harm you or your painting. Tack clothes are used in every wood shop and automotive body shop. They are extremely effective at removing dust and bits of fuzz from your project. By gently dabbing the surface of your painting with a tack cloth, you will eliminate all dust. Remember to do the sides too. You can purchase tack clothes at your local hardware store for about $1.
For harder to remove dust, a kneaded eraser can be used by blotting the surface of the painting. Tape may be used the same way but its not recommended. It can be too adhesive and may lift and remove paint.
For harder to remove dust, a kneaded eraser can be used by blotting the surface of the painting. Tape may be used the same way but its not recommended. It can be too adhesive and may lift and remove paint.
The location
|
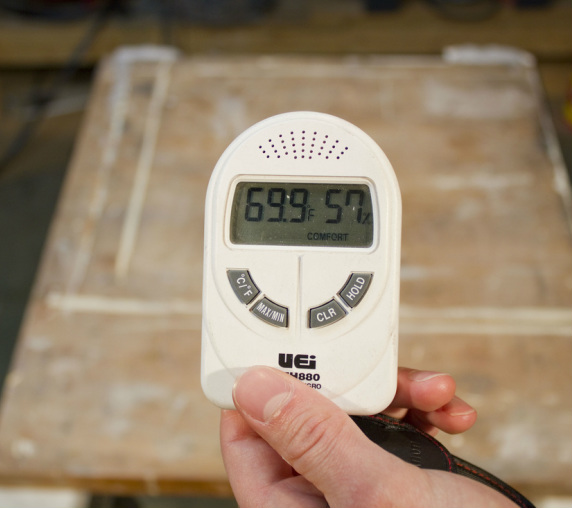
Now that you have 100% of the dust removed from your painting, you want to choose a location to varnish. This place does not have to be a dust free environment. More importantly the spot you choose should have perfectly still air. You don't want any thing that can stir up dust like a breeze, draft, or even footsteps of people passing by. This makes garages and basements good places to varnish your painting as long as they are not too cold and damp. If you are unsure, check the temperature and humidity with a thermometer. Use common sense and avoid varnishing in extreme conditions.
|
|
Finally, Varnishing your painting!
|
|
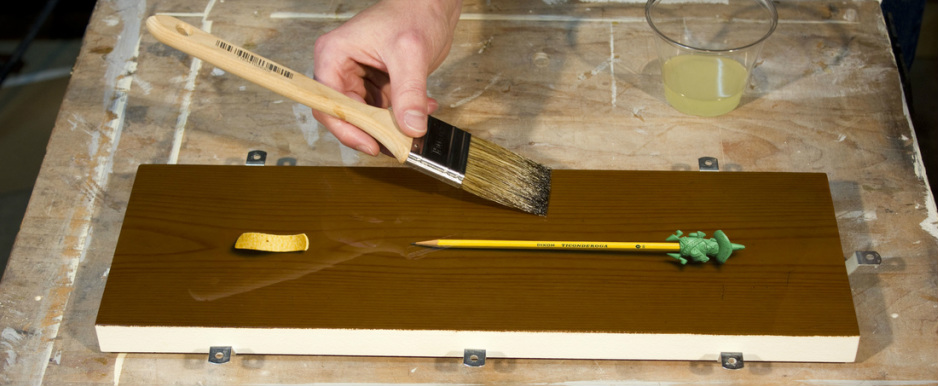
Finally, after selecting your varnish type, purchasing a quality brush, finding an ideal location, and prepping your painting, its time to varnish! If you know solvents bother you, be sure to purchase a good respirator.
Start by thoroughly mixing the varnish and pouring it into a small disposable, solvent safe cup. I like to use a tack cloth on the cup to make sure there isn't any dust in it. The reason you don't want to use the jar or container you store varnish is because the inner lip has the tendency to accumulate dried up goobers of finish. You want to avoid picking these bits up with a brush and transferring them to the painting. |
Next, give your painting a final dust check. Hold it up to an extreme angle of light and examine the surface. Remove any specks you see. Then lay the painting on a flat surface. Take your clean varnish brush, dip it in the varnish, dab it on the lip of the cup to remove the excess, and then transfer it to the painting. Work the brush side to side and then up and down in a cross hatch pattern to evenly distribute the varnish. Then use the method of tipping; hold the brush at a low angle and make long straight passes the length of the painting. Tipping will remove brush strokes. If your painting is large, focus on 1 or 2 square feet starting in the corner of the painting. Once you perfected the area, move to the next section and periodically unify them by tipping. In the mean time continue check for dust or hairs and pick them out if you can. Also watch for areas you may have missed by viewing reflective light in the surface.
Here is something many instructions advise against - Lay down a good "wet coat" of varnish, just don't apply it too heavily to where it pools or sags. Brushing the varnish on thinly is a death trap. The solvent will evaporate out so quickly, you will have zero working time to properly level it out. Make it a habit of controlling the thickness of your finish by adding more or less solvent/thinner to your varnish before you brush it on. The more solvent present means the more of what you lay down with a brush will evaporate out, leaving an overall thinner coat once dry on the painting. If you work on canvas, you usually need the varnish a bit thicker because of the texture, so thinning the varnish from the container probably isn't necessary. With my paintings, being that they are on smooth panels, I want the finish to be a little thinner. So instead of sparingly brushing it on the painting, I add more thinner to the varnish. Since I use damar I add distilled turpentine - about 1 - 1.5 oz. of turpentine per 8 oz. of varnish. If you use an OMS based product like Gamvar, add OMS. This amount gets me a final thickness of varnish I'm after. Keep in mind not all brands are likely to have the same varnish to solvent ratio. While you practice your brushing technique on old discarded paintings, experiment with different ratios of added solvent. This is the best way to determine the correct solvent to varnish ratio for your painting style.
Here is something many instructions advise against - Lay down a good "wet coat" of varnish, just don't apply it too heavily to where it pools or sags. Brushing the varnish on thinly is a death trap. The solvent will evaporate out so quickly, you will have zero working time to properly level it out. Make it a habit of controlling the thickness of your finish by adding more or less solvent/thinner to your varnish before you brush it on. The more solvent present means the more of what you lay down with a brush will evaporate out, leaving an overall thinner coat once dry on the painting. If you work on canvas, you usually need the varnish a bit thicker because of the texture, so thinning the varnish from the container probably isn't necessary. With my paintings, being that they are on smooth panels, I want the finish to be a little thinner. So instead of sparingly brushing it on the painting, I add more thinner to the varnish. Since I use damar I add distilled turpentine - about 1 - 1.5 oz. of turpentine per 8 oz. of varnish. If you use an OMS based product like Gamvar, add OMS. This amount gets me a final thickness of varnish I'm after. Keep in mind not all brands are likely to have the same varnish to solvent ratio. While you practice your brushing technique on old discarded paintings, experiment with different ratios of added solvent. This is the best way to determine the correct solvent to varnish ratio for your painting style.
Once you have completed perfecting the coat of varnish, pour the remaining varnish back into your main container and seal your brush in a plastic bag. This is the time to let the varnish level out and solvents to evaporate. A room with very still air will benefit you because there is less of a chance of stirring up dust which can land and settle in the wet varnish. It will take 15 - 30 minutes before you can come back to it and prop the painting vertical. After this amount of time you will notice the finish is much thinner than it was when you applied it. This is a result of about 90% of the solvent evaporating; at this time it may still be tacky. Let the varnish dry for 24 hours or so in a safe place such as a painting rack. Over the next few weeks the finish will continue to shrink as the remaining solvent gases out of the varnish layer.
If you varnished the painting with a good "wet coat", you shouldn't need to apply a second layer. In fact, I advise against it as additional coats are more difficult to level out over the pervious layer of varnish. Because the resin or polymer that the varnish is made of is a soluble material, it can always be re-dissolved in a solvent. When you reintroduce a fresh coat of varnish over an already dry varnish surface, the first layer will be somewhat dissolved in the fresh solvent. This makes the surface feel sticky and tacky under the brush making it difficult to get an even second coat without disturbing the first. This sort of nit-picky detail, but this is why the first coat of varnish always feels better to apply than subsequent layers.
Cleaning the varnish Brush
|
Cleaning the varnish brush keeps it working like new. Plus you paid quite a bit for that quality brush, you want it to last a long time.
I usually do this procedure outside or I wear a respirator inside because cleaning the brush agitates a lot of solvent. The proper way to remove the varnish from the bristles is to rinse them in various cups of solvent. Each dip and rinse in the progressively numbered cups rids the brush of varnish. If you use damar, you need turpentine; hardware store turpentine is fine. Or, if the varnish is OMS based, OMS in the cups is all you need. I use a combination of the two solvents. The first two cups contain turpentine to rid the brush of damar. In the last two cups is OMS, to rid the brush of turpentine; I find the smell of turpentine obnoxious after a while so I do my best to eliminate it. After the brush is sloshed around in all four cups, I dry it using a paper towel and clean it will soap and water. I like to use "The Master's Brush Cleaner" soap for this. Its safe and fully capable of dissolving and removing any varnish stuck in the bristles. I will soap it up, rinse, and repeat until I feel its clean. Finally, I use a fine comb to straighten the hair and hang the brush vertically to dry. |
|
Last Step
|
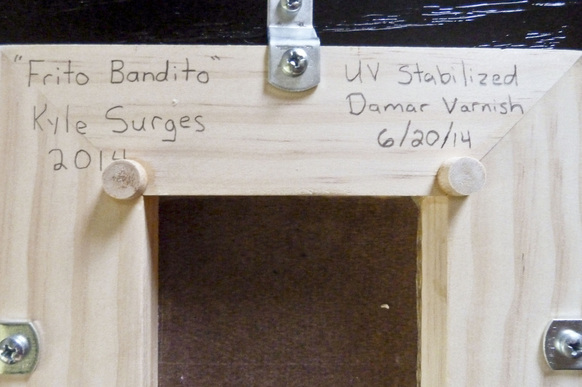
The last step is to label the back of your painting. The title, your name, year, varnish type, and date the varnish was applied will provide the restorer in the next century with enough information on either how to clean and/or remove the varnish.
|
